 Sightline
Record
Press ⇧⌘7 and drag an area, or choose Record Window... or Record Full Screen in Sightline's menu. Recording needs macOS 15 and Sightline Pro. A bar above what you chose starts it with Record, and its microphone and camera buttons leave them out of this recording only. For a full screen recording, its menu bar button leaves out the menu bar at the top. Hover a button to see what it does; esc cancels. Press ⇧⌘7 again or choose Stop Recording to finish. The recording shows as a thumbnail, from where you open it in the editor, like a screenshot.
| Settings > Recording | What it does |
|---|---|
| Start recording right away | Skips the bar with Record, so the recording starts as soon as you choose what to record. |
| Record the menu bar in full screen recordings | On by default. Off records the screen below the menu bar. The menu bar button in the bar with Record changes it too. |
| Countdown before recording | Off, 3 s, 5 s or 10 s. |
| Record microphone | Adds your voice. Microphone picks the input; System default follows macOS. Needs Microphone permission. |
| Camera | Off, or one of your cameras, with its size and frame rate next to it: 720p at 30 fps by default, or up to 1080p or 4K at 60 fps, as far as the camera offers them. Shows you in a bubble while you record, see Camera. Needs Camera permission. |
| Record system audio | The sound your Mac plays, in the same track as your voice. |
| Pointer | In the video records the pointer into the file. Editable in the editor leaves it out and draws it from a track, so you can resize or hide it later. Off leaves it out. |
| Show keystrokes | Off, Shortcuts only or All keys. Notes the keys you press, to show them as labels in the editor. Needs Input Monitoring permission. |
| Resolution, Frame rate, Format | Best (Retina) or Standard (1x); 30, 60 or 120 fps on displays that support it; H.264 (plays everywhere) or HEVC (smaller files). |
Sightline always notes where the pointer moves and clicks while you record, for click highlights and Zoom on Clicks. Keys are only noted with Show keystrokes on, and macOS never passes keys typed into password fields.
Replay
On macOS 27, Keep the last 5, 10 or 15 seconds in Settings > Recording keeps the screen in memory. Press ⇧⌘8 to save those seconds as a recording, for the moment something odd just happened. The recording indicator stays on while Replay is on.
The recording editor
The editor shows the video with the same tools as for screenshots on the bar below it, and a timeline at the bottom with one row per kind of change: Clips, Camera, Sound, Zoom, Keys and a row for marks. Every change can be undone. A recording opened from Finder starts in view mode, with a play bar that fades while it plays; ⌘E switches to editing and back. In a narrow window the tools and the timeline's buttons shrink to icons or wrap onto two rows.
| What | How |
|---|---|
| Play and step | Space plays and pauses, ← and → step through frames. |
| Split | Split at Playhead (⌘B, the Split button or the right-click menu) splits the selected clip, camera part, sound part, keys part or zoom. |
| Cut and reorder | Select a clip and press ⌫ to remove it, drag its ends to trim, drag it to reorder. |
| Speed | 0.5x, 1x, 1.25x, 1.5x, 2x, 4x, 8x or 15x per clip. Faster than 2x plays without sound. |
| Volume | Mute, 25 %, 50 %, 75 %, 100 %, 200 % or 400 % per sound part. ⌫ on a sound part mutes it. |
| Marks | Arrows, shapes, text, highlights, numbers and blurs, each with its own bar on the marks rows. Drag the ends of a bar to choose when it shows. |
Zooms
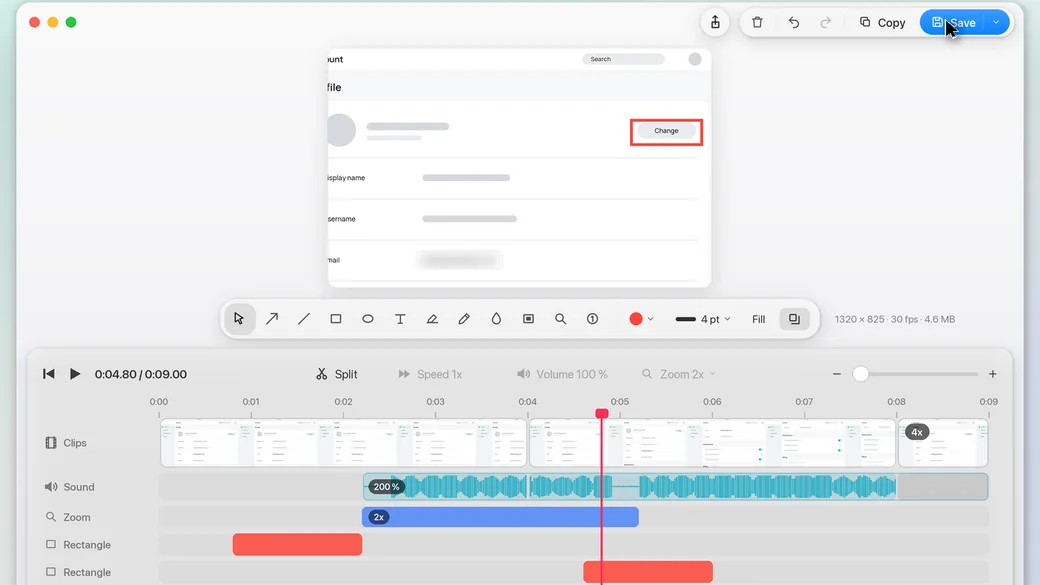
Pick the Zoom tool (M) and drag the area to enlarge. A zoom eases in and out (Smooth) or cuts (Instant), over 0.3 to 1.5 s, at 1.5x, 2x, 3x or 4x. Follow keeps it on the pointer (Follow Pointer) or on what it showed at its start (Follow Content). Zoom on Clicks in the Zoom menu adds a 2x zoom for every click or group of clicks.
Crop
Pick the Crop tool (C) and drag the part of the picture to keep. The shape in the options bar is Free, 16:9, 4:3, 1:1 or 9:16, and Reset crop brings back the whole picture. Return applies the crop, Esc cancels it. The crop covers the whole recording, not a stretch of it. Its size snaps to even pixels and is at least 32 × 32. Export sizes (Original, 1080p, 720p) and the GIF width count from the cropped size, and 720p and 1080p only scale down.
Crop and zoom don't mix. With zooms on the timeline the Crop tool says Remove the zooms to crop, and with a crop the Zoom tool says Reset the crop to add zooms. Zoom on Clicks is off while the recording is cropped.
Blur that follows
A blur on a recording follows what it covers while that scrolls or moves, forward and backward from the frame you drew it on. Its bar grows while Sightline tracks it, and it pauses while the content is off screen.
Pointer and clicks
The Pointer button sets Click highlights (Ripple, Ring or off, in a color). For a recording made with the pointer Editable in the editor, it also has Show the pointer, its size, Hide when not moving and Smooth movement. Smooth movement is on by default: the pointer glides instead of jittering, and still lands exactly on every click and every spot it stopped at.
Keystrokes
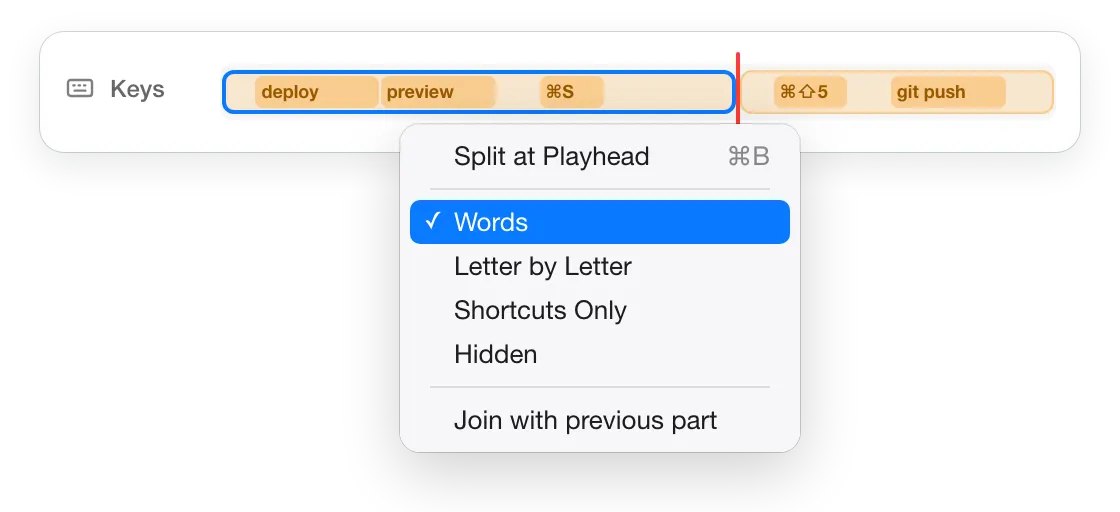
A recording made with Show keystrokes on has a Keys row. Right-click a part to choose how it shows keys: Words builds up typed words and shows shortcuts, Letter by Letter shows each key, Shortcuts Only shows keys pressed with ⌘, ⌃ or ⌥ plus Esc and the function keys, Hidden shows nothing. Split the row to use different modes for different stretches, for example Hidden while you type a password.
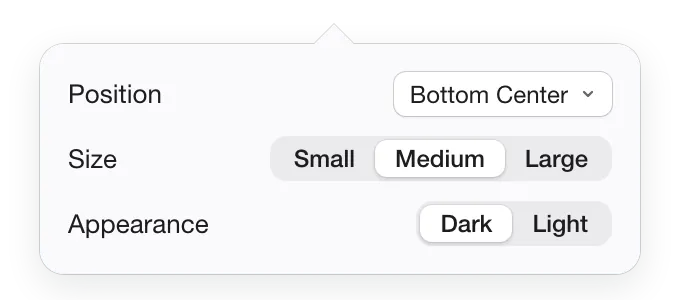
The Keys button sets the labels' Position (Bottom Left, Bottom Center, Bottom Right, Top Center), Size (Small, Medium, Large) and Appearance (Dark or Light).
Camera
Choose a camera in Settings > Recording and you appear in a bubble while you record, from the choice of the area on. It opens in the bottom left of your screen and stays there until you move it. Drag it anywhere, resize it from its edge, and switch between a circle and a rounded rectangle with its shape button. Where it sits over the recorded area is where the camera appears in the video, so moving it while you record moves it in the video too. Outside the recorded area it is only a mirror for you, and the camera starts in the bottom left of the video. Hide camera in the recording controls stops filming until you show it again.
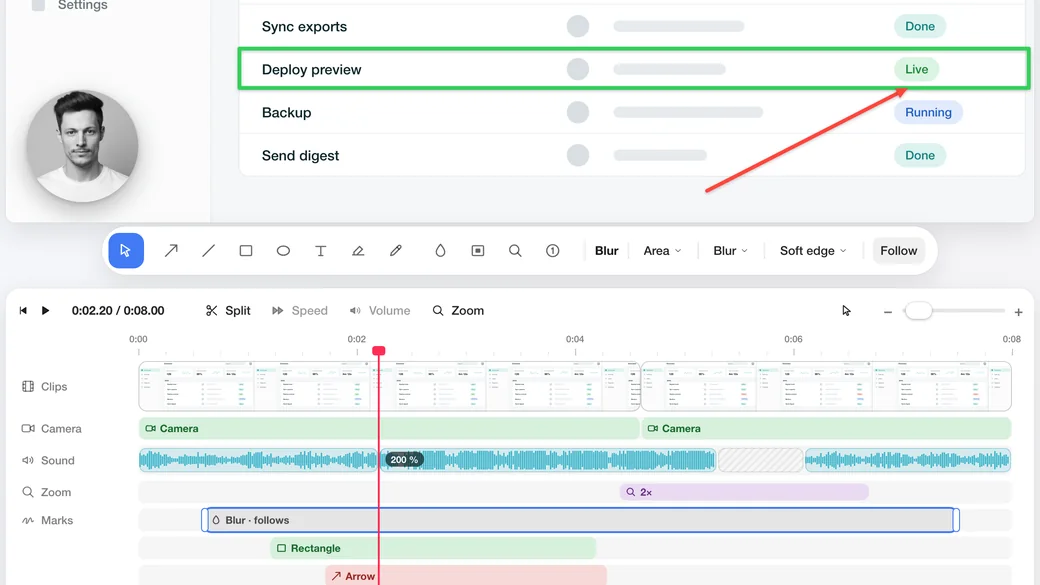
The camera is recorded next to the screen, not into it. The file saved after Stop, and the thumbnail you drag out right away, are the plain screen video, and the thumbnail and History show a camera badge. In the editor the Camera row works like the Sound row: split it with ⌘B, hide a part with ⌫ or Hide Camera in the right-click menu, and drag or resize the camera in the video for the part you are on. While paused, a click on the camera in the video selects its part, and a click on an empty spot unselects it. A selected camera shows its options in the bar below the video, like a mark: Shape, Circle or Rounded Rectangle, Corners for a rectangle (None, Small, Medium or Large), and a Shadow for the whole recording. The Camera button on the timeline has the same choices. Between parts in different places the camera glides like a zoom. Crop and zoom never move it, and cuts and speed changes keep it in step with your voice. Save and Export in the editor draw it in, as MP4, MOV or GIF. Save Camera Video… in the chevron next to Save writes the camera on its own, as it was recorded.
Save and export
- Save (⌘S) writes the finished video. With Keep saved captures editable on, opening it again brings back the clips, marks, zooms, crop, pointer, keys and camera, so you can keep editing.
- Export... writes a separate copy at a size (Original, 1080p, 720p), as MP4 or MOV and at a quality, or as a looping GIF without sound at a width and frame rate.
- Copy puts the video file on the clipboard, ready to paste into Finder, Mail or a chat.
- While the video is written, a ring in place of Save fills up. Hover it for the percent, and click it to stop an export. You can still move through the video in the meantime.
Agents can do all of this too, with record_screen, inspect_recording and annotate. See Editing a recording. Agents never turn on the microphone or the camera.